

How to Flash or Upgrade Nokia Symbian Phones Using Phoenix

Your Phone must be at last 50% charged
During the flashing process, the phone may reboot once or twice. Do not interrupt the flashing process as it could result in a dead phone
Search for the latest firmware
Only flash firmware for your phone model and product code
If you want to remove password, flash PPM only
REQUIREMENTS
Download Nokia Firmware
Download Nokia PC Suite
Download Phoenix Service Software
USB cable
The following are step by step on how to flash Nokia phones such as Nokia 500, N8, E7, C6, C7,X7 & Nokia Oro using Phoenix Service Software
1. Install Nokia PC Suite on your computer (It would install necessary drivers)
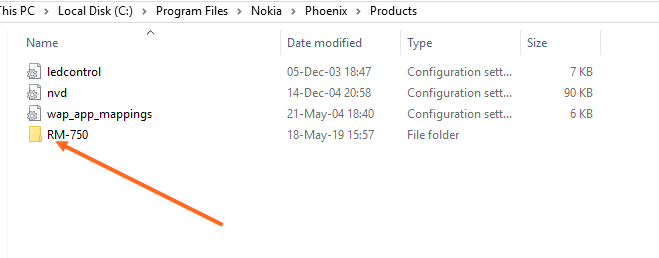
2. Create a new folder on Products Folder ( Local disk C-Program files-Nokia -Phoenix-products and rename it to the model of the phone you want to flash.
For example My Nokia is 500 with model RM-750 (the folder would be named RM-750)

3. Copy the firmware files you downloaded into the RM-750 folder.
4. Launch Phoenix exe and click on the file tab

5. Click on Open product

6. Navigate to and select products and the click OK

7. Click on Flashing tab

8. Click on Firmware Update

9. In Firmware Update. Click on three dots in product Code as seen in the picture below.

10. Click on euro_fr_white_silver and then click OK

11. Tick dead phone USB Flashing and click on Refurbish

12. A new window will open as seen in the picture below. Click OK

13. Power off your phone, remove and reinsert the battery, Connect your phone to the computer via and press power on button. The flashing process will start automatically.

If you found this error Neither DP1.0 Nor DP2.0 was found for the Product, or the product cannot be identified


Post a Comment